|
 |
 |
 |
 |
 |
 |
||||||||||
Vespa KitsSmall Frame: Large Frame: Installations: Polini 130 Install |
Vespa Small Frame - Polini 130 InstallThe Polini kit, like the Malossi can be bolted right on to the casing, but to get its true potential the crankcase mouth transfers need to be opened up and matched to the barrel. That involves a full engine strip so an alternative is to simply mount the barrel. The directions are the same from here onwards whether you changed the transfers or not. If you are starting from a built up bike, here's a guide to removing the original barrel and piston. The kit I had came off a running bike so
I didn't have to mess around with fitting the rings. If yours is a new
kit you'll have to install the rings. A quick guide from a standard
small frame piston can be found here
and the idea is the same for the Polini piston. This section starts after the cases have been ported and the original barrel has been discarded. Three things are very important to make this kit run well. (1) Porting the cases. This really unlocks the power of the kit. If the cases are not ported you'll still get a faster bike but it will the kit won't perform as well as it could. (2) Changing the stock timing. The Polini kit requires a slightly advanced timing point compared to a stock Primavera. The Polini requires 16 degrees BTDC compared to the stock 24 degrees BTDC. (3) Changing the main jet in the carburetor. Since the bike can now burn more fuel because of a more efficient cylinder the main jet must be changed to allow that extra fuel to come through the carb.
Use the new Polini base gasket and slip
it down over the studs. Make sure it aligns with the transfers. Because
my casing transfers were modified, I opened out the transfer areas of
the gasket with an exacto knife to match the transfers beneath. A
modified Vespa one works just as well as the Polini original. Fit the
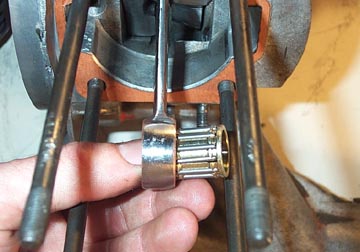
small end bearing after smearing a little two stroke oil over it. It
should slide tightly into the small end of the con rod.
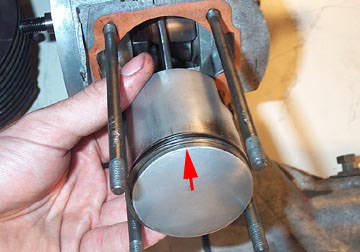
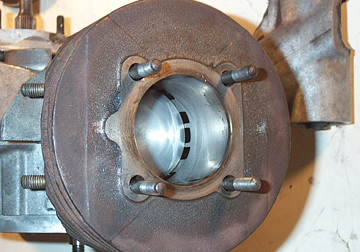
The piston can be installed in two
directions and it is imperative that it faces the correct way. Look on
the dome of the piston and you should see a small arrow. This must
point towards the exhaust pipe which is up and away from the swing arm
pivot as shown above.
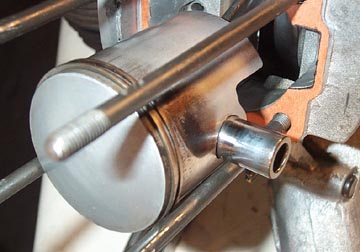
While supporting the piston, carefully
slide the wrist pin into place. If it is especially stubborn you can
heat the piston with a hot wet rag which will make the metal expand
slightly and allow the wrist pin a little more breathing room. Don't be
tempted to hammer it in.
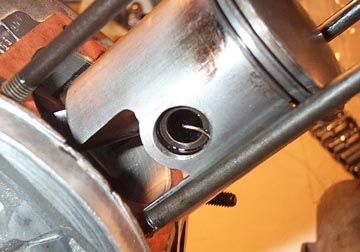
Polini makes wire wrist pin end clips
which are a bit of a pain to fit. Make sure they both fit squarely in
their grooves. I also rotate them so that the wire end is in line with
the piston length (not shown in the picture above).
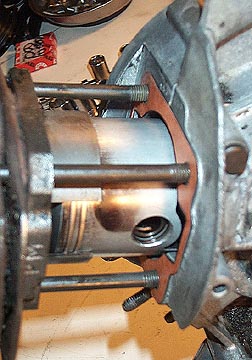
Now comes the barrel. Carefully look at
the bore of the barrel and if you have gasoline and compressed air
available give it a good clean and blow out any debris. Rub some two
stroke oil around the inside bore, and fit the barrel over the tops of
the cylinder studs. The barrel can go on in many different directions
as the studs are in a square format. Make sure the exhaust port is
facing up and away from the swing arm.
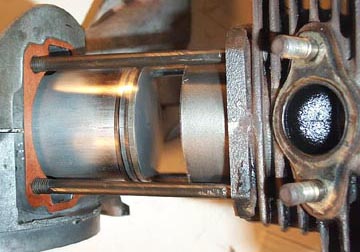
As you slide the barrel down you'll need to find the ring stop
pins and locate the ends of the piston rings at each one. Then compress
the rings with your fingers as you slide the barrel down over the
piston. It should look like above, and the piston should not bind or
stick.
Once the barrel is on, turn the flywheel or crank to make sure
the piston runs through the bore smoothly. The next step is to set the
points gap, and then changing the stock timing to 16 degrees before top
dead center (BTDC).
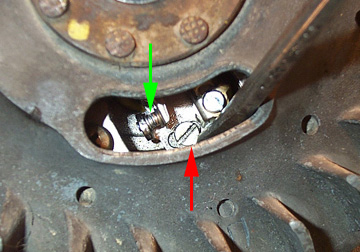
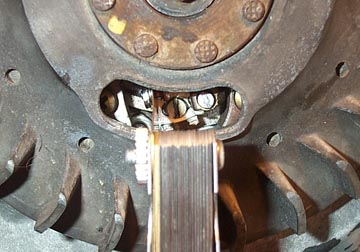
If yours is a points bike then since the flywheel is on the
bike you might as well set the points gap before removing the flywheel
to play around with rotating the stator to 16 BTDC. (If it is an
electronic ignition bike you can skip this step). The gap is the
distance between the faces of the points as they open. The correct gap
for a small frame is 0.30mm to 0.50mm and can only be measured with the
flywheel in place. Pull out the rubber bung in the flywheel so that you
can see the points (green arrow) and you'll notice one large screw (red
arrow) and also a place where you can use a screwdriver to carefully
lever the points apart.
Using a feeler gauge select a 0.35mm thickness and rotate the
flywheel. You'll start to see the points open as the window in the
flywheel passes over them. At their widest point apart, stick the
feeler gauge directly in between them and then loosen the large screw
until you feel the points grab the feeler gauge. Then tighten up the
screw and remove the gauge. The points should stay where they are,
separated by exactly the width of the feeler gauge. If for any reason
this doesn't work, you can slide a small screwdriver in between the two
notches on the far edge of the points (where they overhang the stator
edge) and lever them carefully apart until the feeler gauge is just
slightly released. With the gap set you can now move on to the timing. Changing the timing: With the Primavera
it is necessary to determine where 16 degrees BTDC occurs as there are
no marks other than the stock 24 degree mark that aligns the stator to
the casing. You could use a degree disk after finding TDC as shown on this page, but the more
accurate way to do it is to use a dial gauge and convert the degrees
into millimeters of piston travel and then mark the flywheel and casing
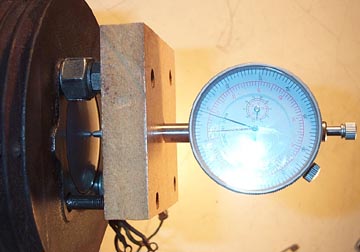
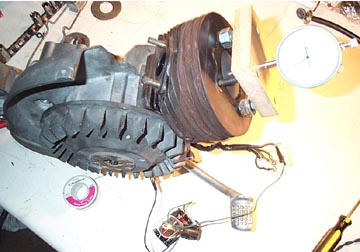
at the correct point. To do this you'll need to fabricate a bracket (we
used a block of wood) to hold the dial gauge in line with the piston
travel.
Use nuts or washers to space the dial gauge off the barrel so that the piston doesn't hit at TDC, and then tighten the whole thing down so the barrel cannot move on the studs. Slowly turn the flywheel causing the piston to rise up against the gauge. As the piston reaches TDC the dial gauge increase until it slows and then will come to a stop at exactly top dead center before starting to decrease as you go past TDC. The point you are looking for is where the piston is at the highest point of travel where the dial gauge display is not increasing or decreasing. At this point scribe a line on the flywheel and on the casing with a sharp object so that the line aligns with itself. Mark this scribe "TDC" on the casing with a marker or just scribe it in. Without moving anything set the dial gauge to 0 mm. To convert
16 degrees into millimeters of piston travel there is a complex formula
but it works out to be 1.25mm. You can check it here if you want to be
sure. Now turn the flywheel anti-clockwise until the dial gauge reads
1.25mm and make another scribe on the casing aligning with the previous
scribe on the flywheel a new scribe on the casing. This is the mark
where the engine should fire. It can now be tested in one of two ways:
statically or dynamically.
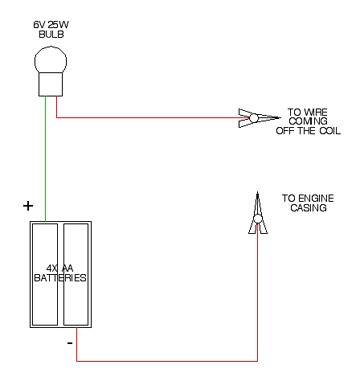
Statically: A simple way to check the exact point of where the points open is to set up a little circuit tester like the one pictured above. You'll need:
Make a small open circuit following the diagram below (or
click it for a PDF). Once you have it made up disconnect the one red
wire on the HT coil (located outside the engine by the rear shock) and
the other contact to the engine casing. If the HT coil is not connected
due to a rebuild you can go directly off the red wire coming from the
stator. Be warned that there is the possibility of very minor 6V shocks
and sparking from doing this - basically it is less voltage than
putting a 9V on your tongue and isn't really anything to worry about.
Turn the flywheel to the TDC line you made and then turn it
counter-clockwise until you see the light bulb get brighter (or is it
more dim - I can't remember right now). Either way the light bulb will
change brightness at the exact moment the points open. If this matches
your scribed mark for 16 BTDC then you are done. If it happens before
you reach your mark (i.e. closer to TDC) then you will need to remove
the flywheel and rotate the stator slightly counter-clockwise. If it
happens after your mark then you will need to remove the flywheel and
rotate the stator slightly clockwise. Unfortunately to check the timing
each time you will need to refit the flywheel until you get it on the
mark. Dynamically: The second way to check the timing is do the same
process to find your TDC and 16 BTDC marks and then build the rest of
the motor, put it back in the frame, and fire it up with a strobe
light. The strobe will flash every time the spark flashes and will show
you exactly where the motor is sparking in relation to your marks.
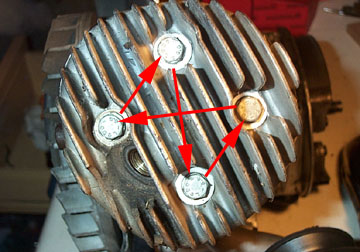
Finally install the cylinder head and torque down the cylinder
head nuts a 1/4 to 1/2 turn at a time in the pattern above (I forgot to
shoot this image on the Polini engine that's why the cylinder nuts are
different).
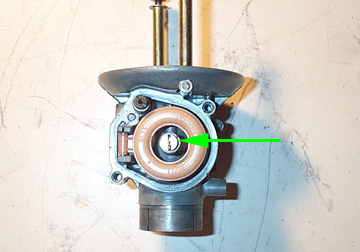
Changing the carb main jet: The final step on the install is to change the main jet in the carb. Here's a section on how to get your carb out so the main jet can be changed. Once the carb is out of the bike drain any residual gasoline from it, and turn it upside down. There are two screws holding the float chamber bottom on to the main body. Remove these screws and you'll see the main jet right in the middle of the float (arrowed above). Use a flathead screwdriver to remove the standard jet and install a the new jet. The size of the jet depends on what else you might have done to the engine, but as a starting point Polini recommends a 76 main jet if you just bolted the barrel on the existing casings. Reinstall the carb, put the motor back in the frame, fill up the oil if you split the cases, and make all the fuel, electrical, and control cable connections. Once you are happy it is time to take the bike for a spin. Be sure to mix your oil to gasoline ratio at 2%. Once you are on the road be very careful with your new kit. I always recommend using a brand new plug so they are easier to read. Check the spark plug color often where the ceramic insulation is visible near the tip of the electrode. This should be a nice, dry, chocolate brown color. Motors must be carefully broken in once they are first put together. Keep the RPMs low at all times, shift gears a lot, and never hang with the throttle in the same position for a long time. Following these rules will really benefit your new cylinder. Once you've covered 500 miles, open her up and enjoy!! |
|||||||||||||||