|
 |
 |
 |
 |
 |
 |
||||||||||||
Vespa Small Frame Engine WorkDropping the engine |
Removing the engineThere are many jobs that can be done with the engine in the frame, but a full rebuild will be 10 times easier with the engine out of the bike. This section will show how to remove a small frame engine from any year so that it can be split on a work bench. Depending on what bike you have, the pictures may look different than the 100 Sport engine in this section but it should be similar. To remove the engine you'll need:
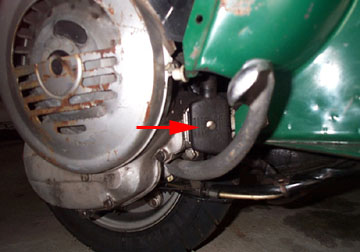
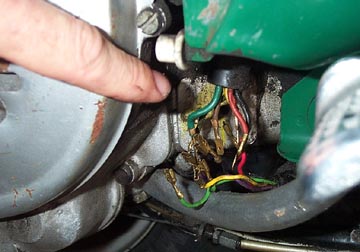
(1) General: The first step is to remove the engine side door and get the bike up on its stand. Wedge something like a jack stand or a piece of wood under the rear of the frame to get the rear wheel just off the ground. (2) Drain the oil: Draining the oil is not absolutely necessary, but there are some positions the engine may be in that will cause oil to leak during the removal process. Click here for a step by step instruction to drain the oil. (3) Disconnect the battery if you have one: If you do have one then it will be located inside the left hand side door of the frame. Remove the fuse and this will disconnect the battery. (4) Disconnect the electrics: The engine junction box is located on the swing arm just in front of the kickstart. A single flathead screw holds the cover and box to the casing.
Get a pad of paper and mark what connections go to what. Usually the wires will just connect to their same color but it is always safe to make a diagram for reinstalling the motor.
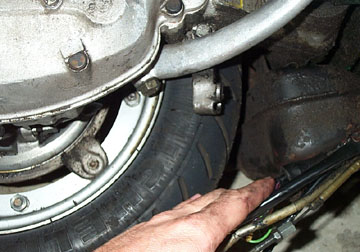
(5) Disconnect the control cables: Just below the kickstart is a bracket which holds the clutch adjuster in place and has all the other cables also passing through it.
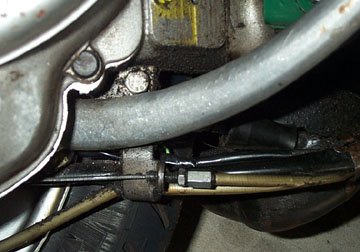
Lean the bike over so you can see where the control cables attach to the clutch (red arrow) and the rear brake (green arrow).
Since the clutch cable needs to be pulled back through the engine mounted bracket you will need to remove the end nipple from the cable. Use a 7mm wrench on the bolt head and an 8mm wrench to keep the body from turning. Loosen it just enough so it will slide off the cable and then feed the cable back through the engine bracket. Use a 11mm wrench to loosen the rear brake clamp. Again, only loosen it enough to remove the cable from the rear hub arm.
The gear selector cables also have nipples that need to be removed. They are accessible by removing the single screw which holds the gear selector cover in place on the underside of the motor. Use the same technique of the 7mm and 8mm wrench, and then feed the cables back through the engine bracket.
With all the cables removed and pushed through the bracket you will be able to pull all the cables clear of the motor. A zip tie is really helpful to hold them together and out of the way. (6) Disconnect the carb: The carb is located inside the frame and connects to an intake tube which passes through a large grommet in the frame. The carb must be removed to allow the tube to pass back through the frame when the engine is removed.
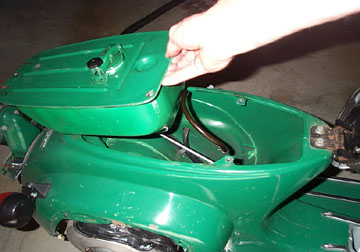
Although it is not totally necessary, I find it a lot easier just to remove the fuel tank at this point. Remove the plastic storage area by pulling it up and out of the frame. Reach down and follow the fuel line until the point where it hits the carb, make sure the gasoline is turned to 'OFF', and remove the fuel line from the carb. Usually this is held in place by a small clip which releases when the ends are squeezed together. Loosen the three tank bolts, and lift the tank out of the frame.
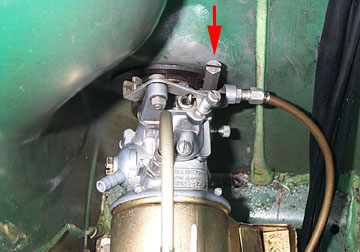
Looking down into the carb space you will see the carb and air filter sitting close to the frame. The red arrow shows the pinch bolt which must be loosened in order to remove the carb from the intake tube. Don't worry about any of the other cables yet, as they are easier to remove once the carb is off. Use a 8mm socket to loosen the pinch bolt. Then start to work the carb off the tube. Slow movements back and forth, and twisting will help get it off. Some fuel may spill from the remaining gas in the float bowl, but this is normal. Â
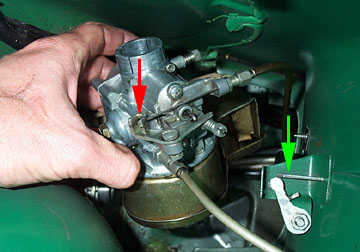
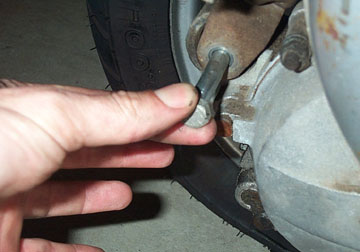
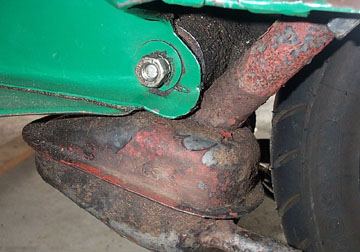
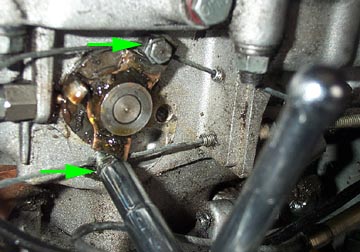
Once the carb is free you can unhook the choke cable from the frame (green arrow) and unhook the throttle cable from the throttle arm (red arrow) and push it back through the adjuster. Then the carb can be removed completely and set aside for later. Once the carb is out stuff a rag down the end of the intake tube so it does not get dirt inside. Â (7) Removing the main pivot bolt and rear shock bolt. The last two items that hold the engine in place are the rear shock connection and the main pivot bolt which passes through the swing arm and the frame. The shock bolt is usually the best to remove first (see below). Use a 14mm driver on the open side and a 14mm wrench on the hidden nut on the back side. If you don't stop the back side from rotating the entire bolt will rotate rather than coming loose. Once removed, used a pair of vice-grips to pull it free. If the bike is up on blocks, the engine should drop slightly until the rear wheel hits the ground.
 The main pivot bolt has a hex head on the engine side and a nut and lock washer on the battery (or plain/glovebox) side. Use the 17mm socket to remove the nut. You may need to clamp some vice-grips to the bolt side to stop it from rotating. The nut and lock washer can be removed without danger of the engine falling out of the bike.
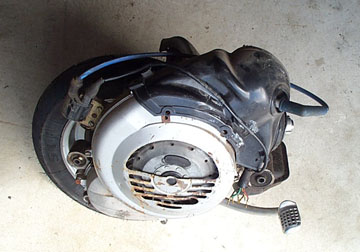
 If you have really nice paint work it is advisable to put a rags between the motor and the frame, and more between the top of the muffler and the frame before removing the pivot bolt. To remove the pivot bolt I like to use a large flathead screwdriver. I have found that if you just pull the bolt out the engine starts to lean towards the left of the bike and makes it harder to get it out. It is much easier to have the engine lean to the right instead. To make this happen I drive the bolt through with a screwdriver and hammer. This way when the threaded end is pushed through the frame, the screwdriver takes the weight. I then use the vice-grips to pull the bolt out at the engine side. Now that the motor is free it can be pulled from the frame. There is no best way to do this, but it works well to let the motor lean over on the right hand side as you wiggle the frame. If all is successful you'll have an free engine like below
Next Section - - > |
|||||||||||||||||

 Â