|
 |
 |
 |
 |
 |
 |
||||||||||
Vespa KitsSmall Frame: Large Frame: Installations: Polini 130 Porting |
Vespa Small Frame - Polini 130 InstallThe Polini kit, like the Malossi can be bolted right on to the casing, but to get its true potential the crankcase mouth transfers need to be opened up and matched to the barrel. To do this the engine needs to be stripped, the crank removed, and all the bearings should be removed.
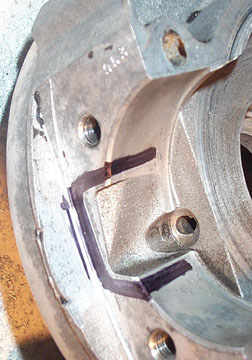
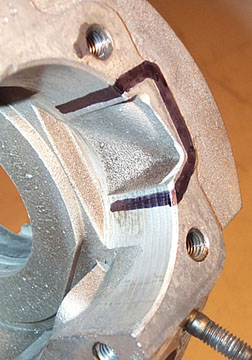
Above is a shot of the crankcase mouth
of a typical small frame case. The Polini kit I got was previously
installed on this engine block without the ports being matched and you
can see an outline of where they hit on the mating face. The original
transfers are small and angled away from the exhaust port. The flywheel
side has a small oil hole to get oil from the primary compression area
into the flywheel side bearing.
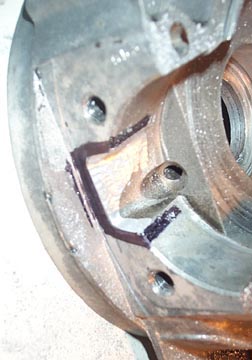
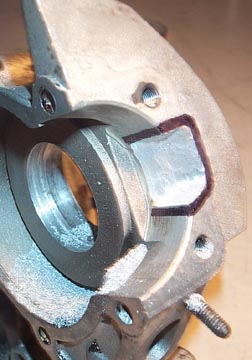
To get an idea of the metal that needs
to be removed, I slid the Polini barrel down over just the crankcase
side to see how much would have to be removed to match the transfers.
The Polini has a wider spigot cut out so the walls of the existing
transfer have to be opened up, and there was also a shelf between the
casing and the barrel transfer.
Dry fit the barrel on to each crankcase
half separately, and use either a pointed scriber or something else
sharp to scribe the shape of the barrel transfer onto the casing gasket
face. Once you have a thin scribed line, it makes it easier to see if
you use a marker to properly mark out the area to be removed so that no
mistakes will happed later. Repeat this process on both sides of the
casing.
Using a Dremel or air power die grinder,
start slowly removing the aluminum from the transfer. It is always best
to start with the flywheel side transfer as it is the more restrictive
of the two. You'll need to make both transfers the same (or close) and
since the backside of the flywheel transfer is against the stator no
aluminum can be added for more thickness to work with. Start slowly and
constantly feel the thickness of the metal to make sure you don't blow
through the casing wall.
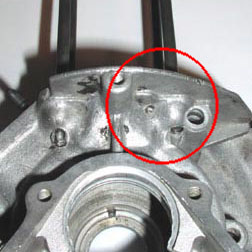
There is a fair bit of material to
remove to match the casings...and unfortunately on the backside of the
clutch side casing there is very little "meat" to work with. Without
modification, you could hardly open the transfer out without blowing
straight through the casing.
The solution is to take the casing to a
local welder and have them bridge the gap as shown with aluminum.
Welding cast aluminum is very specialized, so be sure whoever you take
it to knows what they are doing and doesn't go overboard. It is also a
good idea to leave the closest barrel stud in place so that the holes
are not distorted by the heat. Once the welder has filled the gap you
can move on to the porting work.
Scribe and mark the transfer the same
way as the flywheel side.
Using the Dremel, start slowly on the
clutch side using the same tips as before. The aluminum cuttings are
the reason for stripping the casings. If these get inside a bearing
they can definitley be destructive.
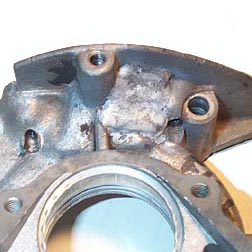
The final look of the transfer should
open out towards the gasket face and taper away as it goes down the
spigot opening. Always work slowly and make sure there is sufficient
metal thickness between the transfer and the backside of the case. The
above shot shows the rough transfer before blending and polishing it
out.
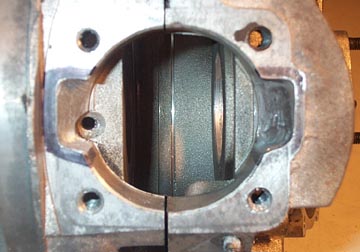
The above shot shows the two transfers
after rough shaping. The next step it to make sure they are very
similar looking to each other, and then use fine grit emery paper to
smooth them out along the ground face. Once all this is complete you
are ready to start rebuilding the motor with the new kit.
Before the crank
was installed I did a final polish of the transfers to make them
smooth and less rough than the previous picture. Once the crank is
installed you can move on to the top end. The kit I had came off a
running bike so I didn't have to messa round with fitting the rings. If
yours is a new kit you'll have to install the rings. A quick guide from
a standard small frame piston can be found here
and the idea is the same for the Polini piston.
At this point I took the original Vespa
cylinder base gasket and slid it down over the new transfers. I marked
the difference and opened out the transfer areas of the gasket with an
exacto knife to match the transfers beneath. Polini also sells a
special base gasket but a modified Vespa one works just as well. |
|||||||||||||||