|
 |
 |
 |
 |
 |
 |
||||||||||||
Lambretta Engine WorkGeneralLambretta |
Clutch Plate Replacement - LambrettaA Lambretta Series 1-3 has very good access to the clutch and can have the cork plates replaced without having to split the main crank case. A few signs that your plates need replacing are that the bike's RPMs increase faster than the speed of the bike (especially when going up a hill), your kickstart is having trouble turning the engine over when it engages properly, and a basic lack of power. Some tools and items you'll need:
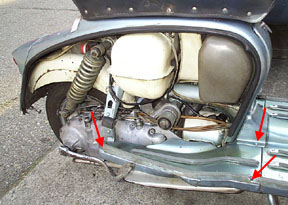
Start by getting the bike on level ground and setting it on the kick stand. The clutch is driven by an enclosed chain and runs in a bath of transmission oil in the right hand side of the engine casing. Step 1: Remove the right hand side rear foot board. This is done by removing 3 nuts that are accessed from underneath. Two of the bolts heads are cast into the plastic outer runner at either end and one bolts the small frame bridge piece down to the floorboard. These are all shown with arrows below. The plastic encased bolt heads have a tendency to spin if the bolt threads are rusty..I still haven't worked out a way to stop this from happening.
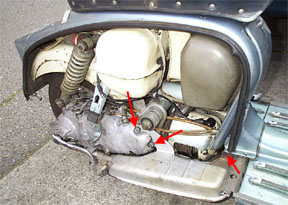
Step 2: Drain the oil. For step by step instructions see the Lambretta oil change page. Step 3: Remove the exhaust. The exhaust is held on by 2 bolts to the face of the chaincase, 1 bolt into the bottom of the main casing, 1 bolt just below the oil drain plug, and a final bolt and compression bracket connecting it to the U-Bend exhaust tube from the engine. All these must be removed to take the exhaust off. Some of the bolts are shown below with arrows.
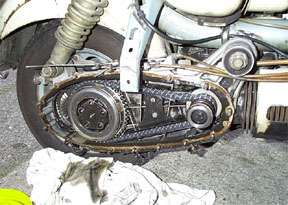
Step 4: Remove the chaincase. Now you should have a clear view of the chaincase. The clutch cable must be removed from the actuating arm and can be done by simply unhooking it from the arm. If you are unsure where the clutch arm is just pull the clutch lever and you'll see it move. Remove all the 10mm (I think) nuts that are around the chaincase perimeter. Once these are all removed the chain case can be pulled off.
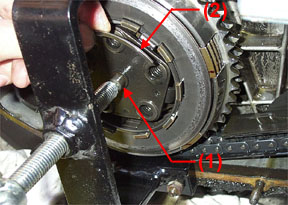
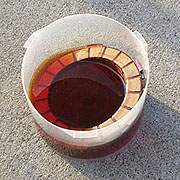
The clutch will now be clearly visible and needs to be compressed before you can remove the old plates for replacement. The only way I have found to successfully do this with a minimum amount of swearing is to buy a specialized tool for the job. This tool literally takes less than a 2 minutes to attach and safely compresses the clutch - highly recommended!! It simply bolts to 4 of the chaincase studs and then a handle can be turned by hand. I left the little clutch actuating cap in place as it rotates as the compressor is tightened while leaving the clutch basket in place (see (1) below) Once the clutch is compressed remove a small retaining clip which runs all the way around the inside lip of the basket (see 2 below). The plates can now be removed and replaced. Take careful notice of the order of the plates and be sure to replace them in the order they were removed.
There are two types of plates in the clutch - plain metal ones with a smooth outer circumferences and a tabbed inner hole and ones with small segmented patches of cork on their faces and notched metal tabs around the circumference. It is rare that the bare metal plates will ever need to be replaced unless the clutch has become very hot at some time and warped them. The cork plates should be soaked in transmission oil before being installed as dry plates have a tendency to grab until they have absorbed oil.
This quick guide assumes that you are not replacing the clutch springs - I'll add info on that when I need to do it to my bike. Re-assembly is the reverse of the disassembly. With new plates you may need to adjust the clutch cable with the small adjuster fitting on top of the main crankcase.
Next Section --> |
|||||||||||||||||