|
 |
 |
 |
 |
 |
 |
|||||||||||
ElectricalElectric Ignition Timing Overview Electric Ignition Timing |
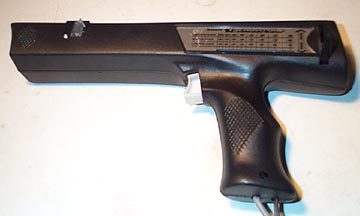
Electronic Ignition TimingAfter a rebuild or if your engine is running badly checking your timing is a good idea. On Vespas starting with the Rally 200 and on Lambrettas after the GP200 the ignition system changed from points to electronic ignition. An overview of the principle of this ignition can be found here. This page shows a typical timing procedure on a P200E but the steps can also be used on other electronic ignition bikes.
You'll need:
If the timing needs to be adjusted you'll also need:
There is really only one part which can be adjusted in an electronic system and that is the stator plate. Piaggio has engineered all the marks and lines so that it is essentially as simple as aligning these marks. If you need to time the bike to a setting other than stock for tuning purposes, you can use this page to determine TDC and when the motor needs to fire. Checking the Timing: When you initially rebuild the bike, align the stator with the mark on the crankcase and screw in the three Phillips head screws to reatin it . This mark is typically a raised line and should align with a similar line on the stator. This is the starting point and the stator may have to be adjusted once the timing is checked. Once the motor is back together, connect your timing light to the HT lead and to a battery. Either start the engine or use a 19mm socket with a drive that can be chucked up in a drill. If you use the drill method, remove the spark plug but still leave it attached to the HT lead and the plug threads grounded to the engine casing. This will make turning the engine with the very easy without compression and there will be no danger of damaging the engine through incorrect timing as the plug isn't igniting anything inside the cylinder. The way a timing light works
is similar to a strobe light in a disco. If you were in a very dark
room on a trampoline and every time you reached the top of your bounce
a strobe light fired, anyone watching you would think you were
levitating because they only see the same quick image and not the drop
and bounce in between. With the engine either running or turning with a
drill the timing gun will quickly flash when the plug fires. Marks
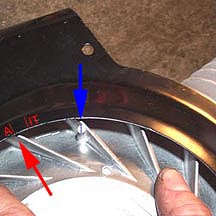
(shown below) on the flywheel and either the fan housing or the
flywheel should match up under the strobe.
There are two types of flywheels that were used on Vespa P series electronic ignition bikes. The images above show the stock timing marks that can be checked with a timing gun.
The marks that should line up
perfectly when this flash happens. If they are significantly off then
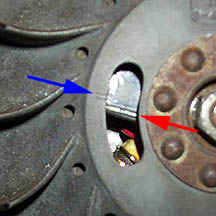
you'll need to adjust the timing by removing the flywheel and rotating
the stator plate in order to bring things back in to alignment. Make a
note of approximately how far off the marks are so you have some idea
how far the stator needs to move. Adjusting the timing: To change the timing you'll need to remove the flywheel and adjust the stator, and then check it with a timing strobe.
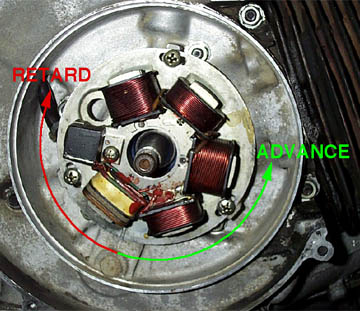
Once the flywheel is off, loosen the 3 stator screws with a Phillips head screwdriver. These just need to be loose enough for the stator to turn by hand. If the timing marks you checked before showed the flywheel mark out of alignment by being too far counterclockwise (left), the stator needs to be rotated to fire the spark plug closer to top dead center (TDC) so it will be need to be turned clockwise and visa versa. In two stroke language if you move the stator to allow the spark to fire closer to TDC you are "retarding" the igntion - if you move it to fire further away from TDC it is called "advance".The amount it needs to be moved is about the amount that the timing marks are off by. Once you have made the move, tighten the three screws, reinstall the flywheel, washer, nut and tighten it down. If you have a P200 you do not install the fan cover as it makes the inspection hole and alignment marks hard to see when checking with a strobe. If you have a PX200, reinstall the flywheel fan cover so that the fan cover marks align with the flywheel line. Keep repeating this process until the marks line up.
|
||||||||||||||||