|
 |
 |
 |
 |
 |
|||||||||||||
BrakesVespa Rear Brake Change Lambretta Rear Brake Change Vespa Front Brake Change Lambretta Front Brake Change Vespa Disk Brakes Disk Brake Bleeding Resources |
Brakes - Bleeding a Disk BrakeThe newest Vespa scooters use a hydraulic disk front brake system which is far better than the cable operated alternative. There are also many kits to change older models to a disk brake setup on Vespas and a hydraulic conversion for Lambrettas fitted with the cable operated disk brake. Whatever the set up, the following section will show how to bleed and replace your hydraulic fluid. You'll need:
Hydraulics work by moving liquid along a hollow hose to make the caliper at the wheel end squeeze a rotating disk. The handlebar end of the system has a small plunger that forces liquid through the line every time you pull it. This plunger must be always be below the level of the small reservoir it sits under or else air might enter the system. Slowly but surely air can work its way into this closed system and when it does the brakes will start to feel 'spongy'. The reason is that liquids cannot be compressed much but air can easily be compressed. If there is air in the system it will compress in the line instead of actuating the caliper.
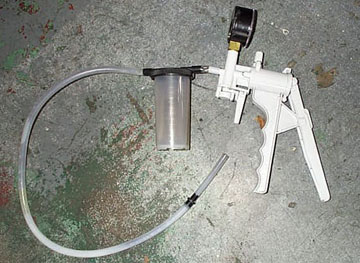
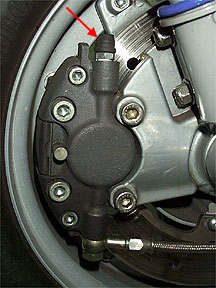
Above is a shot of a fantastic tool that costs about $50 from most auto parts stores. When connected to the brake system it can be pumped to create a vacuum in the tube and suck fluid into the small reservoir just before the handgrip. If you work on cars too, it can do all sorts of diagnostic tasks with the vacuum/pressure valve mounted in front of the handgrip. This is not a necessary tool but it makes it very easy to do with just one person. The first step is to find the bleed valve on your hub mounted disk brake caliper. These shots are off my VBA bike so although a PX200 with a disk brake will look a little different, these steps are still valid. The bleed valve is a small 10mm nut with a hole through it and a small nipple for a tube to be connected.
The bleed valve usually has a small rubber cover to it which needs to be removed (red arrow in above left shot). Once removed the nut can be loosened. Only about a 1/4 turn is necessary to allow the fluid to move out the valve hole.
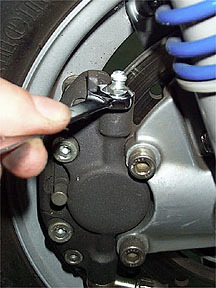
I have done brake bleeding with an extra long tube on the bleed valve but I found a suction tool that is perfect for the job and makes it super easy. If using an extra long tube it will need to be about 2' long and curve down and then back up towards the sky, like a large 'U'. With a tube system you'll be using the master cylinder to push fluid through the system; with the tool you'll be sucking it in from the end of the system. Whether you use a long tube or the tool, you'll need to connect a 1/4" diameter tube to the bleed valve as shown above.
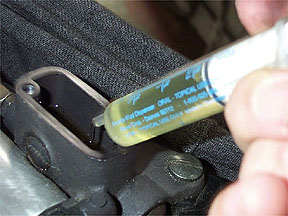
Move up to the handlebar reservoir and there will be two phillips head screws holding the top of the reservoir on. Start by placing and old rag on any painted surface that may possibly get some brake fluid on it. DOT 3 or 4 fluid is a serious paint remover. If you do spill any on your paintwork get it off immediately and it should not mark the surface. Once the top is removed you will be able to see inside the reservoir and the two small holes (arrowed above) which allow fluid into the system. These must always be covered with liquid over the next few steps or you will have to start over. Start by getting everything open and ready. I use a syringe to transfer hydraulic fluid from the bottle to the reservoir because it is easy to control and is easier to avoid splashes on the paintwork. Place the hydraulic fluid bottle in a location where you can refill the syringe quickly as you may need to do this many times while the fluid is being sucked into the system. Once everything is in place it is time to begin.
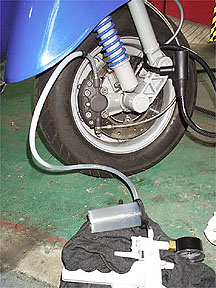
Start by filling the reservoir almost to the top and then bring up the pressure in the vacuum tool by squeezing the trigger about 3 times. You'll see the fluid slowly drain into the small holes in the upper reservoir. THESE MUST BE KEPT COVERED WITH LIQUID AT ALL TIMES. If for any reason they get uncovered you will have to be sure that the air bubble you just introduced to the system is bled out of the bottom valve. At the bleed valve fluid should start to flow into the tool reservoir. It will probably be dirtier than what you are replacing it with and may have bubbles in the tube. Continue to fill the handlebar unit and monitor the fluid coming out of the bleed valve until it is closer in color to the new fluid and there are no air bubbles present. Then let the vacuum pressure release from the tool and slowly depress the handlebar lever. This must be done slowly as fluid may shoot out of one of the small holes at the bottom of the reservoir. If there is any air in this part of the system it will bubble to the top of the handlebar reservoir. Finally, tighten the bleed valve at the caliper leaving the tube in place, and fill the upper reservoir until you hit the MAX line in the window, and refit the top. Pump the vacuum tool three times to build up pressure and then disconnect it from the bleed valve. The suction should stop any spilling from the tube. A single pull of the handlebar lever should be enough to make sure the system is working well.
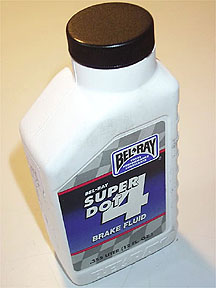
A final word on brake fluid. From what I have found DOT 3 and 4 are interchangeable in most systems. DOT 5 should not be used under any circumstances. Usually the requirements for the system are cast into the top of the handlebar reservoir cover,
Next Section --> |
|||||||||||||||||